GUIDE
Crogl AMI Deployment Guide
Deploy Crogl 2.12.1 on Amazon EC2 from the commercial or air-gapped AMI.
Version: 2.4
Last Updated: October 2026
Product: Crogl AI Security Operations Platform
Delivery Model: Amazon Machine Image (AMI)
Image line: Crogl 2.12.1, us-east-1. Commercial image ami-02731ceaea7db0e68 (crogl-2.12.1-20261007-0657, egress switch off). Air-gapped image ami-07d0f79f229fc69ef (airgap-crogl-2.12.1-20261014-1623, egress switch on).
The image runs the Crogl release installer once at first boot. The web UI is not reachable until you complete a required post-launch step that sets the access mode. See section 7.5.
1. Introduction
1.1 Use Cases
Crogl is an AI-powered security operations platform that helps security teams detect, investigate, and respond to threats. Key use cases include:
- Automated Alert Triage and Prioritization — AI agents analyze security alerts from SIEMs (Splunk, Microsoft Sentinel, Azure Log Analytics, Elasticsearch, CrowdStrike, Cribl) and prioritize by severity, reducing analyst fatigue.
- Threat Investigation — Agents query log sources, correlate indicators of compromise (IOCs), build a knowledge graph of what they learn, and produce investigation summaries with MITRE ATT&CK mapping.
- Phishing Analysis — Automated classification and quarantine of phishing emails using natural language understanding.
- Security Operations Automation — Custom AI skills automate repetitive SOC workflows such as enrichment, case management, and reporting.
- Compliance Reporting — Generate compliance evidence and audit reports from security data.
1.2 Deployment Overview
A Crogl deployment is a single EC2 instance running a self-contained appliance. No additional AWS services are required.
| Component | Purpose |
|---|---|
| crogld | Core server — REST API, web UI, agent orchestration, MCP tool surface, language-model proxy |
| PostgreSQL | Bundled container. Application database: users, settings, encrypted secrets, conversations, knowledge graph |
| Agent containers | One Docker container per conversation, running the AI agent session in isolation |
The AMI ships the Crogl release installer staged at /opt/crogl/crogl-installer-linux-amd64.sh. On first boot a systemd path unit runs it once, which installs Crogl to /home/ubuntu/crogl and starts it.
Resources created during deployment:
| Resource | Type | Purpose |
|---|---|---|
| EC2 Instance | aws_instance | Hosts all Crogl services |
| EBS Volume | root_block_device | 100 GB gp3 (image default), stores application data and Docker volumes |
1.3 Deployment Options
Crogl supports a single-instance deployment within one Availability Zone. All services — database, authentication, application server, agent runtime — run on one EC2 instance.
1.4 Estimated Deployment Time
| Step | Time |
|---|---|
| Launch EC2 instance from AMI | 1–2 minutes |
| Cloud-init, then first-boot installer | 5–6 minutes |
| Retrieve admin credentials and startup key | 1 minute |
| Make the UI reachable (set-access direct) | 1–2 minutes |
| Configure language-model key and first connector | 2–3 minutes |
| Total | ~10–14 minutes |
1.5 Supported AWS Regions
af-south-1, ap-east-1, ap-east-2, ap-northeast-1, ap-northeast-2, ap-northeast-3, ap-south-1, ap-south-2, ap-southeast-1, ap-southeast-2, ap-southeast-3, ap-southeast-4, ap-southeast-5, ap-southeast-6, ap-southeast-7, ca-central-1, ca-west-1, eu-central-1, eu-central-2, eu-north-1, eu-south-1, eu-south-2, eu-west-1, eu-west-2, eu-west-3, il-central-1, me-south-1, mx-central-1, sa-east-1, us-east-1, us-east-2, us-west-1, us-west-2
2. Prerequisites and Requirements
2.1 Technical Requirements
| Requirement | Details |
|---|---|
| Instance Type | Minimum: t3.2xlarge. Recommended: m5.4xlarge |
| Storage | 100 GB EBS gp3 (the image default). |
| Network | VPC with outbound access to your language-model provider, your identity provider, and your connector endpoints. |
2.2 Prerequisite Skills
- AWS EC2 — launching instances, managing security groups and key pairs
- SSH — connecting to Linux instances; required for initial configuration
- Networking — VPCs, subnets, security group rules, DNS
- Language-model providers — obtaining an API key from your chosen provider
2.3 Environment Configuration
Before deploying, ensure you have:
- An AWS account — do not use the root user. Create an IAM user or assume an IAM role with the EC2 permissions in section 4.1.
- An EC2 key pair in the target region. You need the private key (.pem) for SSH — SSH access is required, not optional, because the post-launch access-mode step runs on the instance.
- A VPC and subnet with internet access (public subnet with an Internet Gateway, or private subnet with a NAT Gateway).
- A security group — see section 4.7.
- A language-model API key from your chosen provider.
- At least one connector endpoint — credentials for a querying system (Splunk, Sentinel, Log Analytics, Elasticsearch, CrowdStrike, Cribl, Databricks), a case management system (Jira, ServiceNow), or an enrichment source (VirusTotal).
Optional — stage the administrator password yourself. If you launch through CloudFormation or user-data, you can write your own password to /etc/crogl/admin-password before cloud-init finishes. The first-boot service consumes that file and shreds it. If you do not, Crogl generates a random per-instance password instead — see section 7.4.
3. Architecture
3.1 Architecture Diagram
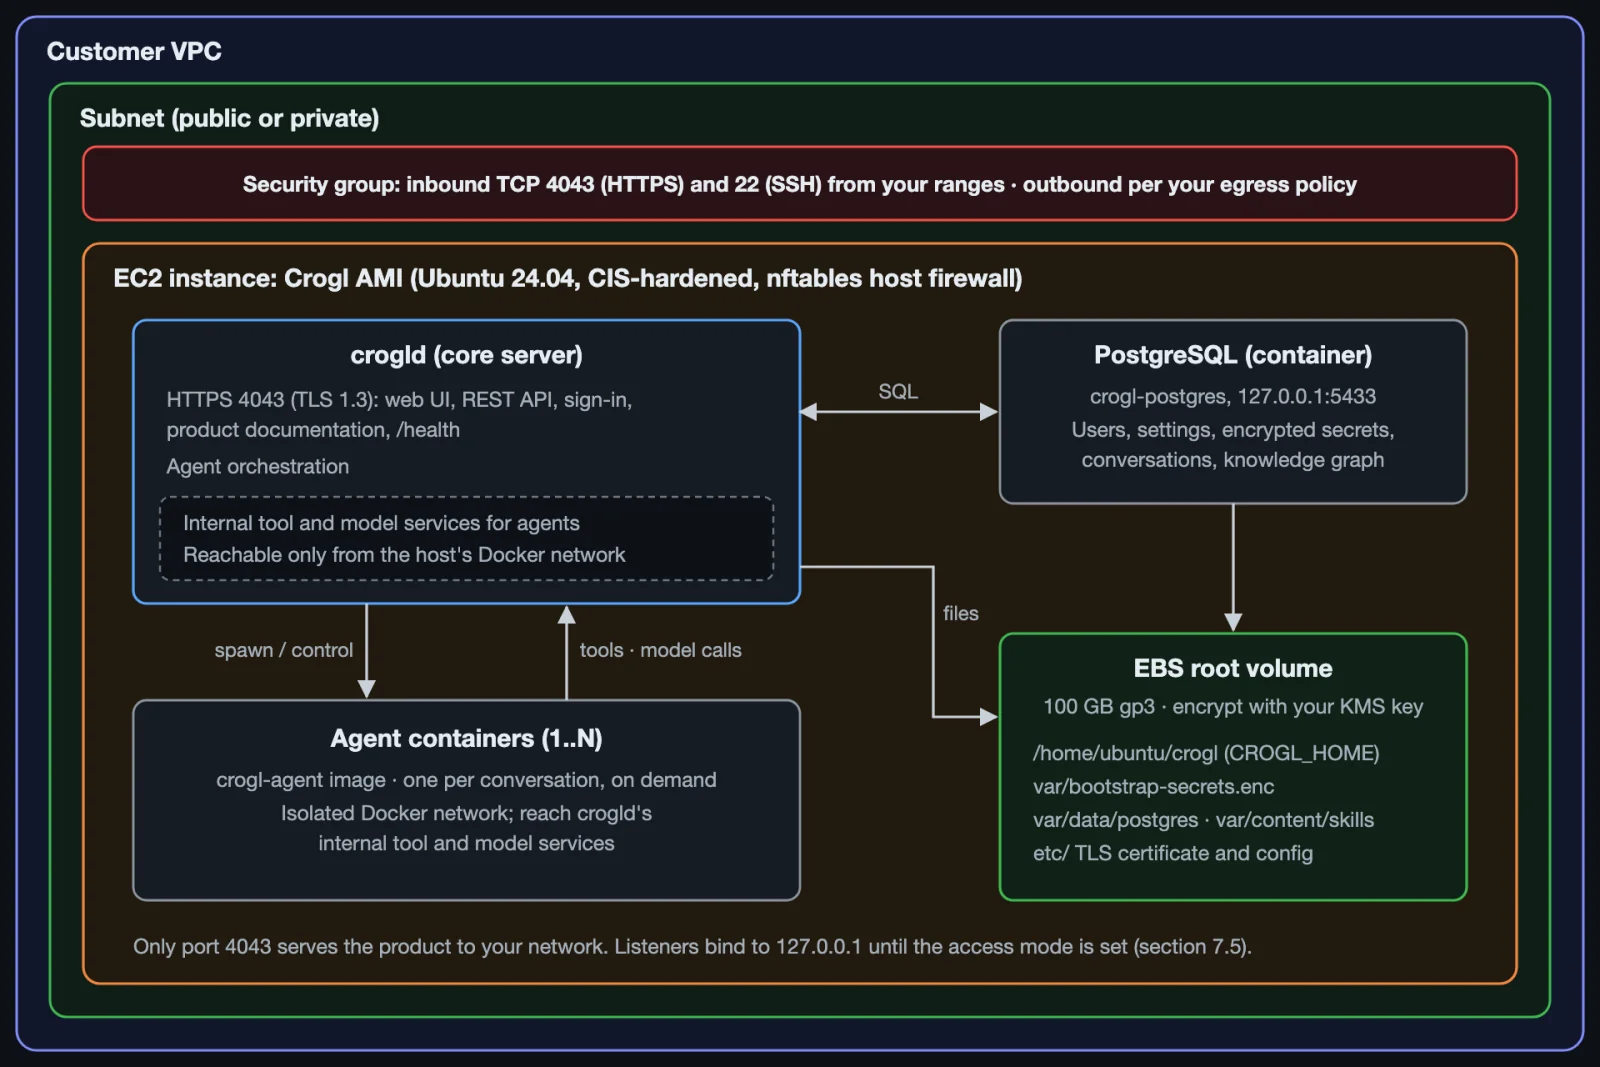
Figure 1. Crogl on a single EC2 instance.
Crogl runs as one self-contained appliance on a single EC2 instance. crogld, the core server, serves the web UI, REST API, sign-in, product documentation and /health on one port, TCP 4043 (HTTPS, TLS 1.3), and orchestrates the agents. Each conversation runs in its own agent container, started on demand from the crogl-agent image. Agent containers reach crogld's tool and model services over the host's internal Docker network; those services are not exposed to your network. The bundled PostgreSQL container listens on 127.0.0.1:5433 and holds users, settings, encrypted secrets, conversations and the knowledge graph. All state lives on the instance's EBS root volume under /home/ubuntu/crogl (CROGL_HOME). Encrypt that volume with your KMS key (section 4.6).
3.2 Network Diagram
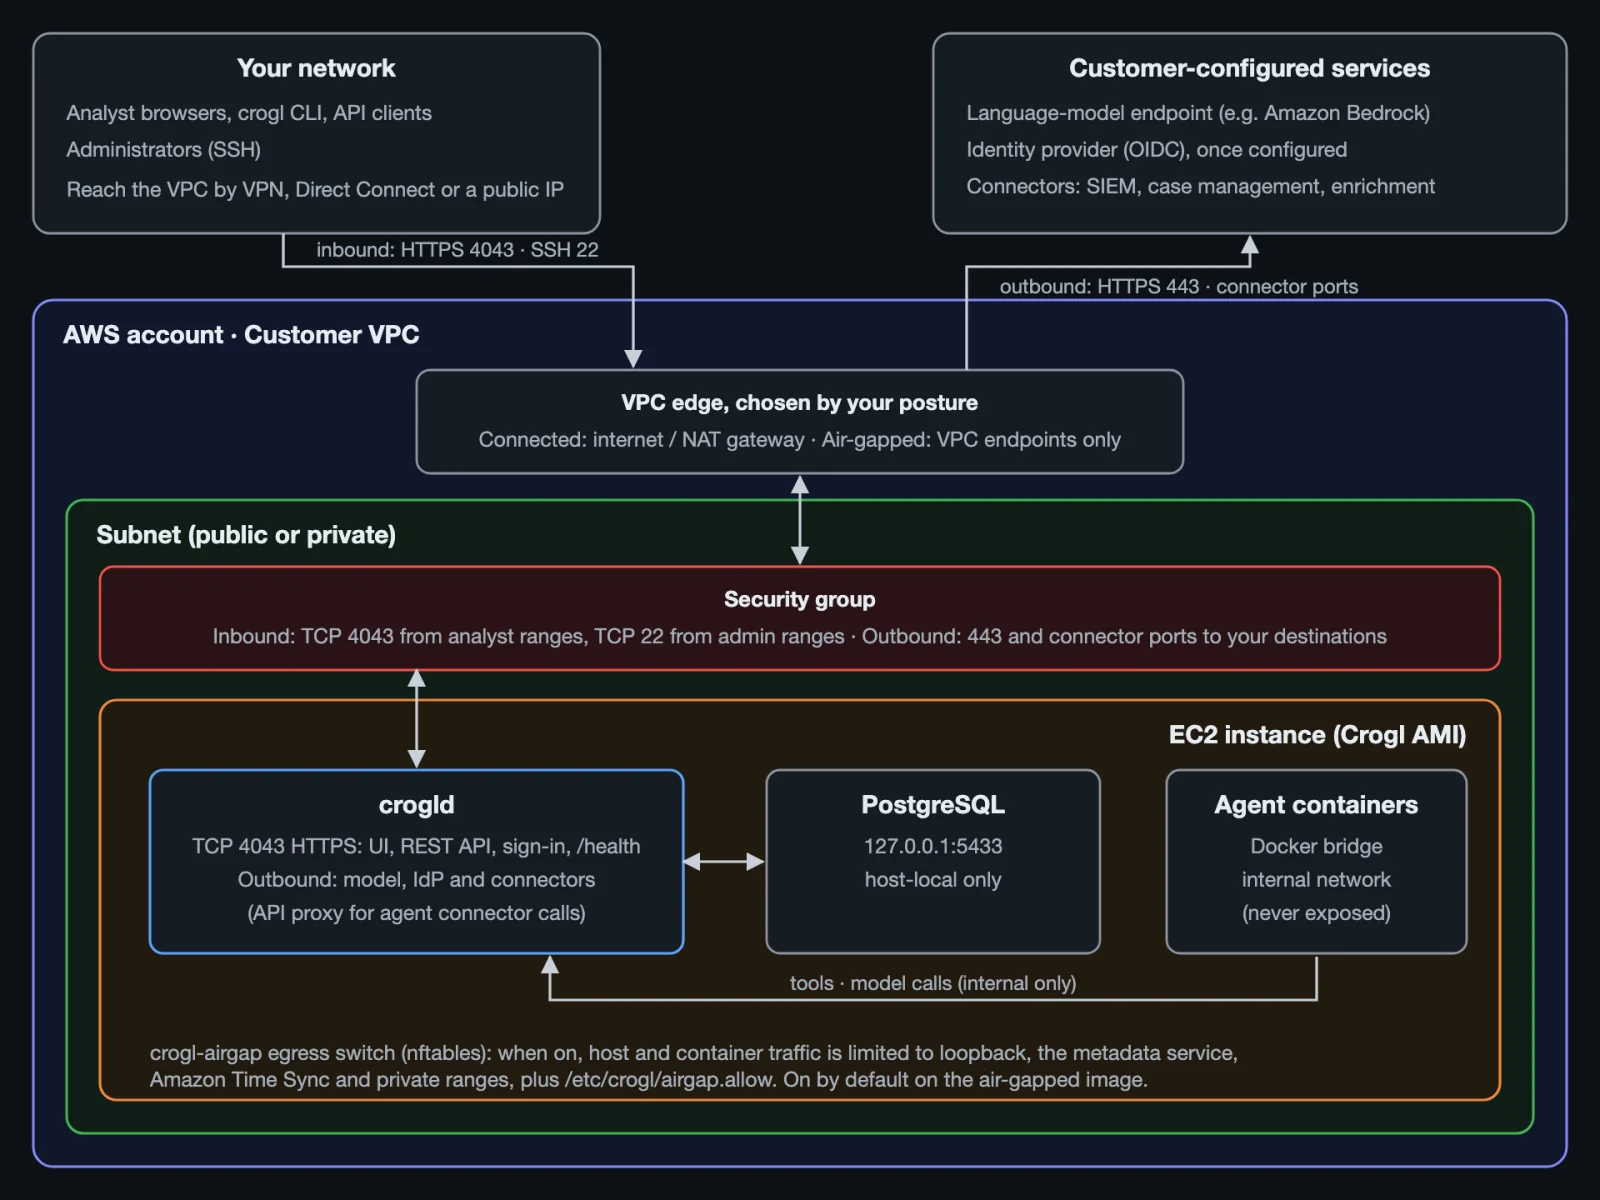
Figure 2. Network paths in and out of the instance.
Inbound, analysts' browsers, the crogl CLI and API clients reach crogld on TCP 4043, and administrators reach the host on TCP 22. Restrict both in the security group to your own ranges (section 4.7). Your users may arrive through a VPN, AWS Direct Connect or a public IP; the subnet can be public or private. Outbound, crogld calls the services you configure: the language-model endpoint (for example Amazon Bedrock), your OIDC identity provider, and your connectors over HTTPS 443 or the connector's own port (for example 8089 for Splunk). Agent containers send their connector calls through crogld's API proxy. In a connected deployment these leave through an internet or NAT gateway. In an air-gapped deployment they reach only VPC endpoints and addresses inside your boundary. The crogl-airgap egress switch then limits host and container traffic to loopback, the instance metadata service, Amazon Time Sync, private ranges and the entries in /etc/crogl/airgap.allow (section 7.5). PostgreSQL and crogld's internal services are never exposed outside the host.
3.3 Integration Points
| Integration | Protocol | Direction | Purpose |
|---|---|---|---|
| Language-model provider | HTTPS (443) | Outbound | Model inference |
| Identity provider (OIDC) | HTTPS (443) | Outbound | Single sign-on, once configured |
| Connectors | HTTPS (443 / custom) | Outbound | Querying systems, case management, enrichment sources |
| Analyst browsers | HTTPS (4043) | Inbound | Web UI and REST API |
All integrations are customer-configured. crogld's other listeners serve only Crogl's own agent containers. Open only the ports listed in section 4.7.
4. Security
4.1 IAM and Root Account Usage
Do not use the AWS account root user to deploy or operate Crogl. Instead:
- Create an IAM user or IAM role with the minimum permissions listed below.
- Use AWS IAM Identity Center (SSO) for human access.
- Use EC2 instance profiles for programmatic access.
Minimum IAM permissions for deployment:
{
  "Version": "2012-10-17",
  "Statement": [
    {
      "Effect": "Allow",
      "Action": [
        "ec2:RunInstances",
        "ec2:DescribeInstances",
        "ec2:DescribeImages",
        "ec2:DescribeKeyPairs",
        "ec2:DescribeSecurityGroups",
        "ec2:DescribeSubnets",
        "ec2:DescribeVpcs",
        "ec2:CreateTags",
        "ec2:GetConsoleOutput",
        "ec2:TerminateInstances"
      ],
      "Resource": "*"
    }
  ]
}
This follows the principle of least privilege — only what is needed to launch, describe, tag, read the console output of, and terminate EC2 instances. No IAM creation, S3 access, or administrative permissions are required.
ec2:GetConsoleOutput is new in this revision: it is how an operator retrieves the auto-generated administrator password without root SSH.
4.2 IAM Roles and Policies
No IAM role or instance profile is required when the language model is a hosted provider such as Anthropic or OpenAI. Crogl makes no AWS API calls in that configuration.
Amazon Bedrock is the exception. Its keyless authentication modes resolve credentials from the instance, which therefore needs an instance profile permitted to invoke Bedrock. AMI delivery creates no IAM resources, so attach one at launch. Section 7.8 gives the modes, the required permissions, and the procedure.
4.3 Keys and Credentials
| Credential | Purpose | Created By | Recoverable? |
|---|---|---|---|
| EC2 Key Pair | SSH access to the instance | Customer (pre-deployment) | No. Back up the private key before launch. |
| Admin password | Crogl admin sign-in | Staged by you at /etc/crogl/admin-password, or auto-generated at first boot | No |
| Startup key | Decrypts the install's bootstrap secrets | Auto-generated at first boot | No |
Both the admin password and the startup key are written once to /root/installation-artifacts.txt (mode 0600). Copy both into your secrets manager and shred that file. Neither can be regenerated or recovered by Crogl.
The administrator password is fixed for the lifetime of the install. Crogl does not support changing it from the UI. To change it, either reinstall or move sign-in to your identity provider — which is the recommended path for production. See section 11.1.
4.4 Secrets Management
Crogl uses a layered secrets architecture. All secrets are unique per deployment and generated at first boot. No secrets are baked into the AMI.
Paths below are relative to the install root, $CROGL_HOME = /home/ubuntu/crogl on this image.
| Secret | Purpose | Location | Created By |
|---|---|---|---|
| Startup key | Decrypts bootstrap-secrets.enc; read by crogld on stdin at every start | $CROGL_HOME/var/bootstrap_encryption_key (0600) | First boot |
| Bootstrap secrets | Encrypted bundle holding PostgreSQL credentials and the data-encryption key | $CROGL_HOME/var/bootstrap-secrets.enc | First boot |
| Postgres credentials | Bundled database authentication | Inside $CROGL_HOME/var/bootstrap-secrets.enc (no separate file) | First boot |
| Language-model API key | Authenticate to the model provider | Encrypted in the PostgreSQL app_secrets table | Customer (post-deployment) |
| Connector credentials | Authenticate to connected tools | Encrypted in PostgreSQL | Customer (post-deployment) |
| TLS certificate / key | HTTPS for the UI and API | $CROGL_HOME/etc/crogld-cert.pem, crogld-key.pem | First boot (self-signed) |
Bootstrap secrets are generated at first boot with openssl rand and stored as owner-only files (mode 0600). They are never transmitted over the network.
Application secrets — the language-model API key and connector credentials — are stored encrypted at rest in PostgreSQL. Set the model key from the Settings screen in the UI, or:
crogl set-secret --key lm_api_key --value '<your-api-key>'
lm_api_key is the only key this command accepts; server-managed internal secrets are refused. The write is an upsert, and the server invalidates its in-memory secrets cache when it commits, so no restart is required.
Session tokens — user sessions are JWT-based, with a configurable inactivity timeout per user under Settings → Session & Security.
4.5 Sensitive Data Storage
| Data Type | Storage Location | Protection |
|---|---|---|
| Language-model and connector credentials | PostgreSQL app_secrets | Encrypted at rest with the per-install data key |
| Local user passwords | PostgreSQL | Argon2id hashing (64 MiB memory cost, above the OWASP 19 MiB floor) |
| Bootstrap secrets and startup key | $CROGL_HOME/var/ | File permissions — owner-only, mode 0600 |
| Conversations, investigations, knowledge graph | PostgreSQL | At rest via EBS encryption (customer-configured) |
| TLS private key | $CROGL_HOME/etc/crogld-key.pem | Owned by the install account |
| Server and CLI logs | $CROGL_HOME/var/log/, ~/.crogl/var/log/ | Readable only by the account crogld runs as, directory included |
Logs carry request paths, connector names, and error detail. Read them as the account that ran the install, and run any log collector as that account rather than widening the file permissions.
4.6 Data Encryption
| Layer | Encryption | Details |
|---|---|---|
| EBS volume | AES-256 (customer-configured) | Enable EBS encryption at the account or volume level. The AMI supports encrypted volumes. |
| Data in transit | TLS 1.3 | The external port (4043) serves a self-signed certificate by default. Replace it with one from your PKI for production. |
| Application secrets | Symmetric encryption in PostgreSQL | Keyed by the per-install data key held inside bootstrap-secrets.enc. |
| Bootstrap secrets | Encrypted file plus file permissions | bootstrap-secrets.enc, decrypted only by the startup key (mode 0600). |
| Internal traffic | Loopback and host firewall | Bundled PostgreSQL binds to 127.0.0.1:5433. crogld's internal services are reachable only from the agent containers on the host, which the host firewall enforces. Read section 12.4 before removing the hardening. |
4.7 Network Configuration
Security group — required inbound rules:
| Port | Protocol | Source | Purpose |
|---|---|---|---|
| 22 | TCP | Your admin IP (e.g. 203.0.113.0/32) | SSH administration — required for setup |
| 4043 | TCP | Your analysts' IP ranges, CLI and API clients | Crogl web UI, REST API, sign-in and product documentation (HTTPS) |
Ports that must not be exposed:
| Port | Service | Why |
|---|---|---|
| 5433 | Bundled PostgreSQL (host port) | Local to the host; unused once you move to external PostgreSQL. |
Outbound rules:
| Port | Protocol | Destination | Purpose |
|---|---|---|---|
| 443 | TCP | Model provider, identity provider | Inference and SSO |
| Connector-specific | TCP | Connector hosts | e.g. 8089 for Splunk, 443 for cloud APIs |
On Linux, Crogl's listeners bind to loopback until you say otherwise. A freshly launched instance installs non-interactively, which selects tunnel mode — bind_host is 127.0.0.1. Opening port 4043 in the security group is therefore not sufficient; you must also set the access mode. See section 7.5.
Recommendation: restrict inbound rules to known IP ranges. The UI and API enforce authentication, but limiting network reach is defense in depth.
4.8 IMDSv2 Support
The Crogl AMI fully supports Instance Metadata Service Version 2 (IMDSv2). All metadata requests use the token-based approach:
TOKEN=$(curl -sX PUT "http://169.254.169.254/latest/api/token" \
  -H "X-aws-ec2-metadata-token-ttl-seconds: 60")
curl -s -H "X-aws-ec2-metadata-token: $TOKEN" \
  http://169.254.169.254/latest/meta-data/instance-id
You can safely set HttpTokens: required on the instance metadata options.
4.9 AWS SDK Usage
crogld embeds the AWS SDK for Go v2 and uses it on the Amazon Bedrock path, both to resolve credentials and to sign requests with Signature Version 4. Under any other language-model provider the SDK is present in the binary but unused. Crogl calls Bedrock over the model URL you configure rather than through a Bedrock service client, so a region-specific or PrivateLink endpoint needs no change to the product. All other external API authentication uses customer-provided credentials configured through the Crogl UI or CLI.
4.10 Operating System Hardening
The image is hardened at build time against a Docker-compatible subset of the CIS Ubuntu Linux 24.04 LTS Benchmark v2.0.0, Level 1 Server profile.
| Measure | State |
|---|---|
| Host firewall | UFW enabled |
| Audit | auditd installed, audit=1 on the kernel command line |
| Mandatory access control | AppArmor enabled (apparmor=1 security=apparmor) |
| SSH | Restricted to the ubuntu account (AllowUsers ubuntu) |
| Password policy | libpam-pwquality |
| SSH host keys | Provisioning authorized_keys removed at bake time |
Every change is recorded in a state manifest under /etc/crogl-hardening/ (backups, drop-in files, permission changes, package and service changes, kernel command-line additions). If hardening conflicts with your environment, revert it on a running instance without rebuilding:
sudo /usr/local/sbin/cis-unharden.sh          # interactive
sudo /usr/local/sbin/cis-unharden.sh --yes    # accept defaults
The script is idempotent and safe to re-run. Reboot afterwards to unwind the kernel command-line changes. Unhardening also removes the host firewall rules that keep Crogl's internal services off your network. Afterwards, allow only ports 22 and 4043 in your security group (section 4.7), or confirm that nothing outside the host can reach any other port. See section 12.4. Documented exceptions to the benchmark, including partition_for_tmp, are listed in the image's HARDENING.md.
5. Costs
5.1 AWS Service Costs
On-demand pricing, us-east-1, as of September 2026. Confirm current rates with the AWS Pricing Calculator.
| Service | Estimated Monthly Cost | Notes |
|---|---|---|
| EC2 instance | ~$243/mo | t3.2xlarge (8 vCPU, 32 GB RAM) on-demand |
| EBS storage | ~$8/mo | 100 GB gp3 at $0.08/GB/mo |
| Data transfer | $0–$50+ | Outbound to model provider and connectors. Varies with usage. |
Reserved Instances or a Savings Plan reduce the compute line substantially for a steady-state deployment.
5.2 Licensing and Software Costs
| Item | Cost Model |
|---|---|
| Crogl platform | See the AWS Marketplace listing for current pricing (subscription or BYOL) |
| Language-model usage | Billed separately by your model provider |
| Connectors | No additional Crogl cost. You supply your own connector credentials. |
6. Sizing
6.1 System Requirements
| Profile | CPU | RAM | Disk | Example instance |
|---|---|---|---|---|
| Evaluation (single user) | 8 cores | 16 GB | 100 GB | t3.2xlarge |
| Production (team) | 16 cores | 64 GB | 1 TB | m5.4xlarge or larger |
Recommended resources scale with the number of concurrent analysts, because each conversation runs in its own agent container.
The installer's first-boot preflight enforces hard minimums of 7 GB RAM and 12 GB free disk — below those it fails rather than installing. Treat them as failure thresholds, not sizing guidance.
Log volume headroom. crogld.log rotates at 100 MB and keeps its 10 most recent compressed archives, so budget 150–250 MB in steady state but size for 1.1 GB: compression runs in the background and a burst of rotations can leave eleven full-size files on disk until it catches up. crogld.out is neither rotated nor pruned — add headroom for it, or rotate it with logrotate.
6.2 Self-Hosted Language Models
If you run an open-weight model in your own environment rather than using a hosted provider, the inference host needs at least 80 GB of VRAM on an FP8-capable GPU (a single NVIDIA H100 80 GB). That covers evaluation or a single session; production concurrency needs more GPUs.
7. Deployment Instructions
7.1 Step 1: Subscribe to Crogl on AWS Marketplace
- Visit the Crogl product page on AWS Marketplace.
- Click Continue to Subscribe.
- Review and accept the terms.
- Click Continue to Configuration.
- Select your AWS region and the latest AMI version.
- Click Continue to Launch.
7.2 Step 2: Launch the EC2 Instance
Option A: Launch from AWS Marketplace (Console)
- On the Launch page, select Launch through EC2.
- Choose instance type (see section 6).
- Configure the key pair (SSH is required for setup), your target VPC and subnet, a security group using the rules in section 4.7, and a 100 GB gp3 root volume.
- Click Launch Instance.
Option B: Launch via AWS CLI
aws ec2 run-instances \
  --image-id ami-XXXXXXXXXXXX \
  --instance-type t3.2xlarge \
  --key-name your-key-pair \
  --security-group-ids sg-XXXXXXXXXXXX \
  --subnet-id subnet-XXXXXXXXXXXX \
  --metadata-options 'HttpTokens=required' \
  --block-device-mappings '[{"DeviceName":"/dev/sda1","Ebs":{"VolumeSize":100,"VolumeType":"gp3","Encrypted":true}}]' \
  --tag-specifications 'ResourceType=instance,Tags=[{Key=Name,Value=crogl-production}]' \
  --region us-east-1
7.3 Step 3: Wait for the First-Boot Install
A systemd path unit (crogl-firstboot.path) waits for cloud-init to finish, then triggers crogl-firstboot.service exactly once. That service:
- Resolves the administrator password — from /etc/crogl/admin-password if a provisioner staged one, otherwise generates a random per-instance password.
- Runs the staged installer as the ubuntu user with --home /home/ubuntu/crogl --start.
- Installs Docker prerequisites, loads the crogl-postgres and crogl-agent images, generates TLS certificates and bootstrap secrets, and starts PostgreSQL and crogld.
- Writes /root/installation-artifacts.txt and the success sentinel /var/lib/crogl/installed.
This takes about 5 minutes. Monitor it over SSH:
ssh -i your-key.pem ubuntu@<public-ip>

journalctl -u crogl-firstboot.service -f    # live progress
sudo tail -f /var/log/crogl-firstboot.log   # installer output
Confirm success:
test -f /var/lib/crogl/installed && echo "install complete"
curl -sk https://localhost:4043/health | jq .
The service is gated on that sentinel, so it will not re-run on later boots. If the installer fails, the sentinel is not written and the service retries on the next boot.
Set up your shell. The commands in this guide use $CROGL_HOME and run the crogl CLI by name. The image sets neither, so add both to the ubuntu user's shell once:
echo 'export CROGL_HOME=/home/ubuntu/crogl' >> ~/.bashrc
echo 'export PATH="$CROGL_HOME/bin:$PATH"' >> ~/.bashrc
source ~/.bashrc
Run Crogl commands as ubuntu. Do not run them with sudo.
7.4 Step 4: Retrieve the Admin Password and Startup Key
Both values are written once to a root-only file:
sudo cat /root/installation-artifacts.txt
If you did not stage your own password, the generated admin password is also printed to the serial console, so you can retrieve it without SSH once the first-boot install has finished:
aws ec2 get-console-output --instance-id <instance-id> --latest \
  --output text --query Output | grep -A5 'CROGL ADMIN PASSWORD'
--output text --query Output returns the console log as lines; without it the AWS CLI returns one JSON string and grep cannot isolate the password block. --latest requires a Nitro instance type (m5, t3); on m4, omit it. If nothing matches, wait a few minutes for the install to finish and try again. The startup key is not printed to the console; read it from the file above.
The default username is admin.
Do this before anything else. Copy the admin password and the startup key into your password manager or secrets vault, verify you can sign in, then shred the file:
sudo shred -u /root/installation-artifacts.txt
Crogl cannot recover either value. The startup key decrypts this install's bootstrap secrets — without it, the install cannot be recovered if the host is rebuilt or var/bootstrap_encryption_key is lost.
7.5 Step 5: Set the Network Posture
The non-interactive first-boot install selects tunnel access mode, which binds the UI and API listeners to 127.0.0.1. Until you change this, the UI is not reachable from your network regardless of your security group.
Choose one.
Direct access (production). Bind the listeners to all interfaces and regenerate the TLS certificate with the right names:
/home/ubuntu/crogl/bin/crogl.sh set-access direct --hostname crogl.example.com
# or, if analysts reach the host by address:
/home/ubuntu/crogl/bin/crogl.sh set-access direct --ip 10.0.1.25
SSH tunnel (evaluation). Leave the mode as-is and forward the ports from your workstation:
ssh -i your-key.pem -L 4043:localhost:4043 ubuntu@<public-ip>
set-access restarts Crogl to apply the change. It owns the bind_host line in crogld.yaml — set it with this command rather than editing the file, which crogl.sh will revert.
Outbound access: connected or air-gapped
Crogl needs no internet access for itself. The AMI carries its container images, and the installer runs offline. The product makes no licence check and no update check. Telemetry is off unless you configure it. What needs egress is the systems you point Crogl at:
- The language model. This is mandatory.
- Your identity provider, after sign-in moves to OIDC.
- Your connectors.
- The package archive, if you apply OS updates yourself.
Outbound connections the operating system makes
The image is Ubuntu 24.04 LTS. Some standard Ubuntu services connect to public endpoints on a schedule. Crogl does not use these connections. The table lists each one, so that you can permit it or stop it.
| Service | Destination | When | Stopped by crogl-airgap |
|---|---|---|---|
| apt-daily, apt-daily-upgrade, unattended-upgrades | <region>.ec2.archive.ubuntu.com, security.ubuntu.com | Daily | Yes |
| Ubuntu Pro (ua-timer, ESM apt hook) | esm.ubuntu.com | Daily, and on apt update | Yes |
| motd-news | motd.ubuntu.com | Twice daily | Yes |
| fwupd-refresh | cdn.fwupd.org | Daily | Yes |
| update-notifier | Ubuntu archive | Daily | Yes |
| snapd refresh | api.snapcraft.io | Several times daily | Yes (refresh held) |
| pollinate | entropy.ubuntu.com | First boot | Yes |
| amazon-ssm-agent | ssm, ssmmessages and ec2messages endpoints in your region | Continuous | No |
| systemd-timesyncd | 169.254.169.123 (Amazon Time Sync) | Continuous | Not needed, link-local |
The SSM agent connects to the Systems Manager endpoints in your own region. Without interface VPC endpoints those names resolve to public addresses, so with the egress switch on the agent retries and fails continuously. Give it interface VPC endpoints for those three services, or stop it with sudo snap stop --disable amazon-ssm-agent. The air-gapped image leaves the agent running.
Connected deployment. Allow outbound 443 to your model provider and identity provider, and connector-specific ports to your connector hosts. This is the posture described in section 4.7.
Air-gapped deployment. Where the instance has no route to the internet — an isolated VPC with no internet gateway or NAT, or a region that is isolated from the internet by design — the product still runs, but four things change.
- The language model must be reachable inside the boundary. A hosted provider such as Anthropic or OpenAI is unreachable by definition. Use Amazon Bedrock in-region, as described in section 7.8, or run an open-weight model on your own GPU hosts and point Crogl at it, as described in section 6.2. Decide this before you deploy. It is the only component with no offline fallback.
- Set the time source. See Time source below.
- Install your certificate authorities. See Certificate authorities below.
- Constrain egress at both layers. See Constrain egress below.
Time source
Images built on or after 14 September 2026 use the Amazon Time Sync Service only. The image sets NTP=169.254.169.123 in /etc/systemd/timesyncd.conf.d/cis-ntp.conf. 169.254.169.123 is link-local, so it needs no route off the instance.
Earlier images also list public pool servers in that setting. In an air-gapped environment those servers are unreachable.
To use your own time server, or to remove the pool servers from an earlier image:
Create a drop-in file that sorts after the image's own file:
# /etc/systemd/timesyncd.conf.d/zz-local-ntp.conf
[Time]
NTP=
NTP=169.254.169.123
Replace 169.254.169.123 with your own time server if you use one. The empty NTP= line resets the list. Without it, timesyncd adds your server to the servers that earlier files set.
Restart the service: sudo systemctl restart systemd-timesyncd
Check the result: timedatectl timesync-status
Certificate authorities
Public certificate authorities are not present in an air-gapped region. Your own certificate authority signs your connector, identity and model endpoints. Crogl checks most connections against the host trust store. Command-line tools that run inside an agent container use the trust store of the container image. The Endpoint Trust page in the product documentation on the instance gives the full procedure.
To add a certificate authority to the host:
sudo cp corp-ca.pem /usr/local/share/ca-certificates/corp-ca.crt
sudo update-ca-certificates
/home/ubuntu/crogl/bin/crogl.sh restart
Crogl reads the trust store when it starts, so the restart is necessary.
To remove a certificate authority that you added:
sudo rm /usr/local/share/ca-certificates/corp-ca.crt
sudo update-ca-certificates --fresh
/home/ubuntu/crogl/bin/crogl.sh restart
To remove a public root that the operating system supplies:
- Open /etc/ca-certificates.conf.
- Find the line for the root, for example mozilla/Example_Root_CA.crt.
- Put an exclamation mark at the start of that line.
- Run sudo update-ca-certificates --fresh
- Restart Crogl: /home/ubuntu/crogl/bin/crogl.sh restart
For agent containers, name a PEM bundle in the container block of /home/ubuntu/crogl/etc/crogld.yaml, then restart Crogl:
container:
  extra_ca_file: /home/ubuntu/crogl/etc/corp-ca.pem
The agent runtime trusts the certificate authorities in that bundle. A skill that runs a command-line tool directly against your endpoints needs your certificate authority in the agent image itself. The Endpoint Trust page shows how to extend the image. An upgrade replaces crogld.yaml, so add the container block again after each upgrade.
Constrain egress
Two paths leave the instance, and different controls govern them. Traffic the host sends — Crogl reaching the model endpoint, and the API proxy reaching a connector — is locally generated. Traffic an agent container sends is forwarded, not locally generated, so it does not pass the host firewall's output chain at all. A rule written only against host traffic leaves every agent container unrestricted. Constrain both, and verify by testing rather than by reading the rules.
Layer 1: the VPC. Remove the internet gateway and NAT route, or restrict the security group's outbound rules to your model endpoint, identity provider and connector hosts. A security group governs both paths, because it acts on the instance's network interface rather than inside the operating system. This layer is the boundary. Configure it whether or not you also use the switch below.
Layer 2: the instance. Images built on or after 23 September 2026 carry crogl-airgap, a switch that blocks outbound internet access from the host and from agent containers together. On the commercial image the switch is off when the image ships. The air-gapped image (named airgap-crogl-<version>-…) ships with the switch on at every boot and the operating system jobs below already stopped; on that image, sudo crogl-airgap status reports the switch on and the enable step below is already done. Check whether your image has the switch:
command -v crogl-airgap
If the command is absent, use the VPC controls alone. If it is present, turn the switch on:
sudo crogl-airgap enable
sudo crogl-airgap status
The switch permits loopback, the instance metadata service at 169.254.169.254, the Amazon Time Sync address at 169.254.169.123, and the private ranges 10.0.0.0/8, 172.16.0.0/12 and 192.168.0.0/16. It drops everything else. The switch stays on after a reboot.
In images built on or after 6 October 2026, enable also stops the operating system services in the table above, so that they make no attempts to connect. It stops and masks their systemd timers and services, and it holds snap refreshes. It records the earlier state of each unit in /etc/crogl/airgap.quiesced. The status command shows whether these services are stopped. The SSM agent and the time service continue to run.
Two consequences follow from the default allow list.
Do not block the metadata service. Crogl reads its Bedrock credentials from 169.254.169.254 when it runs in instance_role mode, described in section 7.8. Blocking that address disables the language model. The switch permits it for this reason. Keep it permitted in any rule you write yourself.
A Bedrock deployment that uses an interface VPC endpoint needs no further configuration. The endpoint address, the VPC DNS resolver and the Docker bridges all sit inside the private ranges above. The same is true of a SIEM or a ticketing system hosted inside your VPC.
Add any destination outside those ranges to the allow list, then reload:
sudo nano /etc/crogl/airgap.allow
sudo crogl-airgap reload
Each line is an address, a CIDR block or a hostname. A hostname is resolved when the rules are built and its address is fixed into them, so run reload again if that address changes.
The switch blocks the package archive along with the rest of the internet. Apply operating system updates before you turn the switch on. To apply updates later, see section 11.2.
To restore unrestricted outbound access:
sudo crogl-airgap disable
disable also restores each operating system service to the state it had before enable.
Verify from inside an agent container as well as from the host. A check that runs only on the host passes while the container path is still open:
# from the host
curl -sS --max-time 5 https://1.1.1.1 ; echo "exit=$?"

# from a container on Crogl's network
sudo docker run --rm --network crogl_default --entrypoint sh crogl-agent:latest \
     -c 'curl -sS --max-time 5 https://1.1.1.1' ; echo "exit=$?"
Both commands must fail, and an agent turn and a connector query must both still succeed.
The container check must bypass the image entrypoint, and --entrypoint sh is how it does so. crogl-agent:latest starts /bin/bash, so a command written as "docker run ... crogl-agent:latest curl ..." runs bash with curl as a script name. That fails for the wrong reason and reports a block that is not there. Do not shorten the command.
7.6 Step 6: Sign In and Configure Crogl
- Open
https://<your-host>:4043(or https://localhost:4043 over the tunnel). - Accept the self-signed certificate warning, or install a certificate from your PKI first.
- Sign in as admin with the password from Step 4.
- The UI guides you through connecting a language model and adding at least one connector. Have your model API key and connector credentials ready.
7.7 Step 7: Set the Crogl URL
So that links Crogl posts into other systems resolve for whoever follows them — the ticket comment an investigation writes links back to the full report only when this is set — record the address analysts use. Set it as the Crogl URL on the Platform screen in Settings, or:
crogl update-config platform.origin=https://crogl.example.com:4043
An https address with no path. Include the port, :4043, unless a proxy serves Crogl on port 443. It is unset by default; until you set it, Crogl posts the same comments without a link rather than a broken one.
7.8 Configure Amazon Bedrock Without a Static Key
Bedrock is the one language-model provider that authenticates with AWS credentials rather than an API key. Crogl offers four authentication modes. Three resolve credentials from the instance and store no secret.
-
instance_role — reads the EC2 instance role from the instance metadata service and nothing else. Environment and shared-config credentials are ignored, which makes the credential source a configuration assertion rather than whatever the host happens to hold. A stray access key fails loudly instead of being used. This is the mode to choose.
-
assume_role — calls AWS STS to assume a named role, authenticated by the host identity. Requires a role ARN and accepts an external ID.
-
default_chain — uses whichever AWS identity crogld runs as: environment variables, shared config, web identity, ECS, then instance metadata, first match wins. Use it for ECS task roles or EKS IRSA.
-
api_key — a Bedrock bearer token held as an application secret. This is a static authenticator. Do not use it where static credentials are prohibited.
Step 1: Create the instance profile.
The role needs two Bedrock actions, bedrock:InvokeModel and bedrock:InvokeModelWithResponseStream, on the model resources you intend to call. Its trust policy names ec2.amazonaws.com. For assume_role, the target role trusts the instance role as principal and the instance role needs sts:AssumeRole on it.
AMI delivery creates no IAM resources, so provision the role and instance profile yourself and attach the profile at launch:
aws ec2 run-instances ... --iam-instance-profile Name=crogl-bedrock
To attach to an instance that is already running:
aws ec2 associate-iam-instance-profile --instance-id <id> --iam-instance-profile Name=crogl-bedrock
Step 2: Point Crogl at Bedrock.
In Settings then Language Model, choose Amazon Bedrock and the authentication mode. The AWS region is required for Bedrock in every mode, including api_key: the signing scope is region-bound and the agent's provider block needs it regardless of how the call authenticates. A wrong region fails as SignatureDoesNotMatch.
The model URL must be the bare runtime endpoint with no model in the path, for example https://bedrock-runtime.us-east-1.amazonaws.com. A model in the path leaves the connection test passing while every agent turn fails.
The three role modes additionally require an https model URL and refuse to run with TLS verification disabled, because SigV4 carries temporary credentials in a request header.
Step 3: Verify.
Run the connection check on the Language Model screen. It resolves credentials and signs a request, so a misconfiguration surfaces here rather than on the first agent turn. A failure naming the credential source means the instance profile is missing or unattached; a failure from the role itself means its trust policy refuses the caller.
Air-gapped and restricted regions.
Bedrock is an AWS API call, so it needs a network path even where the instance has no route to the internet. Reach it over an interface VPC endpoint rather than by opening outbound access. Crogl signs the request itself and sends it to the model URL you configure, so this needs no change to the product.
Create the endpoint in the subnet the instance runs in, with private DNS enabled:
aws ec2 create-vpc-endpoint \
  --vpc-id <vpc-id> \
  --vpc-endpoint-type Interface \
  --service-name com.amazonaws.<region>.bedrock-runtime \
  --subnet-ids <subnet-id> \
  --security-group-ids <endpoint-sg> \
  --private-dns-enabled
Give the endpoint's security group inbound 443 from the instances that will use it, and give the instance outbound 443 to that security group. Nothing else needs opening, and general internet egress stays closed.
The endpoint's private DNS name is the same hostname as the public service, so leave the model URL as the bare runtime endpoint. Private DNS applies to the whole VPC and takes a short while to take effect; before testing, confirm with dig that the hostname resolves to an address inside your subnet rather than a public one.
instance_role needs no STS endpoint. Credentials come from the instance metadata service at 169.254.169.254, which is link-local and needs no route off the instance. assume_role calls AWS STS, so it needs an interface endpoint for com.amazonaws.<region>.sts as well.
Where you cannot use an interface endpoint, credential resolution still follows the AWS SDK's default configuration, so the standard SDK environment variables and shared config file will redirect the STS and instance-metadata calls. Set AWS_CA_BUNDLE to point the SDK at your own certificate bundle where those endpoints are signed by a certificate authority the host does not already trust; adding the authority to the host trust store, as section 7.5 describes, has the same effect for every component at once.
Verified on 2026-09-20: a t3.2xlarge with no outbound internet access, an instance profile granting Bedrock access, and a bedrock-runtime interface endpoint completed both the Crogl connection test and a live inference call.
Confirm that Bedrock is offered in your target region before planning on it, and confirm the model identifier as well. The us. prefix on an identifier such as us.anthropic.claude-sonnet-4-6 denotes a cross-region inference profile, and the profiles on offer differ between partitions.
7.9 Next: Graduate to Production
A fresh install runs with local-admin sign-in, the bundled database, and a self-signed certificate. That is the right shape for evaluation and the wrong one for production. Make these changes early, before your team builds up state:
| Step | Why now |
|---|---|
| Move sign-in to your OIDC identity provider | Replaces the fixed local admin password with your SSO and role mapping |
| Move to external PostgreSQL | Starts a fresh, empty database. Connectors, investigations, skills, and the knowledge graph do not carry over |
| Replace the self-signed certificate | Browsers trust Crogl without client-side setup |
| Trust your corporate CA | Lets Crogl reach internally-signed connector endpoints |
Moving to external PostgreSQL issues a new startup key — replace your stored copy when you do.
8. Testing and Troubleshooting
Shell examples use $CROGL_HOME for the install root. On this image:
export CROGL_HOME=/home/ubuntu/crogl
8.1 Verify Services Are Running
# Health and containers
curl -sk https://localhost:4043/health | jq .
docker ps --filter name=crogl

# First-boot install
test -f /var/lib/crogl/installed && echo "install complete"
systemctl status crogl-firstboot.service --no-pager

# Logs
tail -f "$CROGL_HOME/var/log/crogld.log"   # structured server log
tail -f "$CROGL_HOME/var/log/crogld.out"   # startup output - read this first if crogld never came up
8.2 Health Check Endpoints
| Check | Expected Response |
|---|---|
| curl -sk https://localhost:4043/health | {"status":"ok"} |
| curl -sk https://localhost:4043 | HTML page (Crogl UI) |
| docker exec crogl-postgres pg_isready -U crogl | "accepting connections" |
8.3 Common Issues
Startup and access:
| Symptom | Cause | Resolution |
|---|---|---|
| Cannot SSH to instance | Security group missing port 22, or SSH restricted to ubuntu | Add inbound TCP 22 for your IP; connect as ubuntu, not ec2-user or root |
| UI unreachable at the public IP, but curl -sk https://localhost:4043 works on the host | Access mode is tunnel — listeners bound to 127.0.0.1 | crogl.sh set-access direct --hostname <name> (see section 7.5) |
| Connection refused on :4043 shortly after launch | First-boot installer still running | Wait ~5 min; watch journalctl -u crogl-firstboot.service -f |
| /var/lib/crogl/installed never appears | Installer failed | sudo tail -200 /var/log/crogl-firstboot.log. Most common cause is too little RAM — the preflight hard-fails below 7 GB |
| Installer fails on first docker call | ubuntu not in the docker group | The first-boot wrapper adds it idempotently; check id -nG ubuntu and re-run the service |
| crogld exits immediately after install | Bad crogld.yaml, failed migration, or a panic | Read $CROGL_HOME/var/log/crogld.out — pre-logging failures go there, not to crogld.log |
Authentication:
| Symptom | Cause | Resolution |
|---|---|---|
| Cannot sign in as admin | Password lost | Not recoverable. Retrieve from /root/installation-artifacts.txt if not yet shredded, or aws ec2 get-console-output. Otherwise reinstall or move to your IdP |
| API returns 401 Unauthorized | Expired token | Re-authenticate: crogl login, or crogl get-access-token |
| Model calls return 401 | Invalid or missing model API key | Set it in Settings, or crogl set-secret --key lm_api_key --value '<key>' |
| Sign-in works but no connectors are visible | Role claim not mapped from your IdP | See the Identity Provider documentation on the instance |
TLS and certificates:
| Symptom | Cause | Resolution |
|---|---|---|
| Self-signed certificate warning | Expected on a fresh install | Accept in the browser, or install a certificate from your PKI |
| Browser cannot reach Crogl at all | Certificate expired | Renew: crogl.sh set-access <current-mode> --force |
| Certificate name mismatch after moving hosts | Certificate generated for the old name | crogl.sh set-access direct --hostname <new-name> regenerates it |
| Connector calls fail with certificate errors | Internally-signed endpoint, or a proxy intercepting TLS | Add your corporate CA to the host trust store |
Connectors:
| Symptom | Cause | Resolution |
|---|---|---|
| Connector queries time out | Network path, credentials, or service load | Verify security group egress, connector health, and routing |
| Connector returns 401/403 | Expired or invalid credentials | Update them on Settings → Connectors |
8.4 Log Locations
| Log | Location | Purpose |
|---|---|---|
| First-boot installer | /var/log/crogl-firstboot.log, journalctl -u crogl-firstboot.service | The one-time install |
| Server | $CROGL_HOME/var/log/crogld.log | crogld's API, MCP, and model proxy |
| Server startup | $CROGL_HOME/var/log/crogld.out | Migrations, bad config, panics — anything before structured logging starts |
| CLI client | ~/.crogl/var/log/crogl-<timestamp>-<pid>.log | One file per command, newest 100 kept |
| Agent | docker logs crogl-agent-u<uid>-c<id> | One container per conversation |
Find the most recent CLI run:
ls -t ~/.crogl/var/log/crogl*.log | head -1
Filter the server log by service, or pull out errors:
grep '"event":"access.api"' "$CROGL_HOME/var/log/crogld.log"   # UI and API requests
grep '"service":"lmproxy"' "$CROGL_HOME/var/log/crogld.log"
grep '"service":"mcp"'     "$CROGL_HOME/var/log/crogld.log"
The server log is JSON, so jq gives you more:
# Error summary, most frequent first
jq -r 'select(.level == "ERROR") | .msg' "$CROGL_HOME/var/log/crogld.log" \
  | sort | uniq -c | sort -rn

# Slowest requests (duration is in milliseconds)
jq -r 'select(.event == "access.api") | "\(.duration) ms \(.path)"' "$CROGL_HOME/var/log/crogld.log" \
  | sort -rn | head
To raise verbosity while chasing a problem, set log_level in $CROGL_HOME/etc/crogld.yaml to debug and restart. The default is info; an unrecognized value falls back to info.
9. Health Monitoring
9.1 Health Check
/health is the single endpoint for automated monitoring. It is also what the installer polls to decide the server came up.
curl -sk https://localhost:4043/health | jq .
9.2 Host Capacity Warnings
Crogl watches the host's CPU, memory, and filesystems and warns administrators when one runs short. The readings are on the Host Resources card of the admin dashboard.
| Resource | Warning | Critical | What a warning means |
|---|---|---|---|
| CPU | 90% busy | 98% busy | Investigations take longer while the host stays busy |
| Memory | 85% used | 95% used | An agent container can be killed by the kernel before it finishes |
| Filesystem | 80% used, or under 10 GiB free | 95% used, or under 5 GiB free | Saving a skill, writing a log, or starting an agent container can fail |
A filesystem takes whichever of its two measures is worse, so a small volume can cross the free-space floor while its percentage still looks comfortable.
9.3 Additional Metrics
| Metric | Source | Suggested Threshold |
|---|---|---|
| API latency | crogld.log (.duration in ms, on access.api lines) | > 5000 ms p95 |
| Error rate | crogld.log (.level == "ERROR") | > 1% |
| Disk usage | df | > 80% |
| Container memory | docker stats | > 90% |
| Certificate expiry | certificate file | < 30 days |
9.4 Certificate Expiry Check
openssl x509 -in "$CROGL_HOME/etc/crogld-cert.pem" -noout -enddate
9.5 Restart
$CROGL_HOME/bin/crogl.sh restart
Never pass --force to crogl.sh up on a running install. It regenerates the bootstrap secrets, which makes all encrypted database data unreadable. Use plain up, down, or restart for normal operation.
10. Backup and Recovery
10.1 Data Stores
| Data Store | Location | Backup Method |
|---|---|---|
| Startup key | $CROGL_HOME/var/bootstrap_encryption_key | Your secrets manager. The single most important item |
| Bootstrap secrets | $CROGL_HOME/var/bootstrap-secrets.enc | EBS snapshot or file copy |
| Database (bundled) | $CROGL_HOME/var/data/postgres | EBS snapshot or pg_dump |
| Attachment bytes | $CROGL_HOME/var/attachments | Same backup as the database — see below |
| Server configuration | $CROGL_HOME/etc/crogld.yaml | File copy — keep one before an upgrade |
| TLS certificates | $CROGL_HOME/etc/crogld-cert.pem, crogld-key.pem | EBS snapshot or file copy |
| Skills | $CROGL_HOME/var/content/skills/ | EBS snapshot or file copy |
| Logs | $CROGL_HOME/var/log/ | EBS snapshot or log forwarding |
var/attachments and the database are two halves of one dataset. Files users attach to the assistant are stored as bytes on disk with only their metadata in PostgreSQL, so an attachment is one row plus one file. Restore both from the same backup. Crogl reconciles a mismatch automatically and the database wins: files it does not account for are unlinked, and rows whose files are gone are marked permanently unavailable. Pairing a database with a newer attachment store therefore loses the files that database never knew about.
One case the reconciler refuses to act on: if not one expected file is present, it changes nothing and logs at error level, because that is what an unmounted volume looks like. If you see those errors, confirm the store directory is mounted and belongs to this database before restarting anything.
An EBS snapshot of the root volume captures the database and the attachment store together, which is why it is the recommended method.
10.2 Backup Procedure
EBS snapshot (recommended). These commands run on the instance and need AWS credentials that allow ec2:DescribeInstances and ec2:CreateSnapshot. The image has none, so attach an instance role with those permissions, or run the last two commands from a workstation with your instance ID:
TOKEN=$(curl -sX PUT "http://169.254.169.254/latest/api/token" \
  -H "X-aws-ec2-metadata-token-ttl-seconds: 60")
INSTANCE_ID=$(curl -s -H "X-aws-ec2-metadata-token: $TOKEN" \
  http://169.254.169.254/latest/meta-data/instance-id)
VOLUME_ID=$(aws ec2 describe-instances --instance-ids "$INSTANCE_ID" \
  --query 'Reservations[0].Instances[0].BlockDeviceMappings[0].Ebs.VolumeId' \
  --output text)

aws ec2 create-snapshot --volume-id "$VOLUME_ID" \
  --description "Crogl backup $(date +%Y%m%d)"
Database-only backup:
umask 077
BACKUP_DIR=$(mktemp -d "$HOME/crogl-backup.XXXXXX")
docker exec crogl-postgres pg_dump -U crogl -d crogl \
  > "$BACKUP_DIR/crogl-backup-$(date +%Y%m%d).sql"
umask 077 and the private directory make the dump readable only by you. Do not write backups to /tmp. A pg_dump is not sufficient on its own. The data in it is encrypted with the key held in bootstrap-secrets.enc, which the startup key decrypts, and it does not contain the attachment bytes. Keep the dump, bootstrap-secrets.enc, the startup key, and var/attachments — captured at the same moment.
10.3 Recover an Install from the Startup Key
You need your saved startup key in one situation: var/bootstrap-secrets.enc survived but var/bootstrap_encryption_key did not. A rebuilt host, a backup restored without var/, a deleted file, or an install moved to new hardware all produce it.
- Launch a new instance from the same AMI version and let the first-boot install complete.
- Stop Crogl: $CROGL_HOME/bin/crogl.sh down
- Restore var/bootstrap-secrets.enc, the PostgreSQL data directory, and var/attachments — all from the same backup. The PostgreSQL data directory, var/data/postgres, belongs to the database container's own user (UID 70), not ubuntu. Restore it from the EBS snapshot, or as root with ownership kept:
sudo tar --numeric-owner -xzpf <archive> -C $CROGL_HOME. - Delete the startup key that first boot created:
rm $CROGL_HOME/var/bootstrap_encryption_key.crogl.shasks for the saved key only when no key file is present. If you kept the original key file, restore it in its place. Crogl then starts without the prompt. - Run $CROGL_HOME/bin/crogl.sh up. It finds the encrypted state with no key beside it and prompts for the startup key.
- Paste the key. Crogl writes it back and confirms the install was restored — existing accounts and data come back with it.
Without the startup key, encrypted data is unrecoverable. Crogl cannot regenerate it. If both the key and your copy are gone, the only path forward is a fresh bootstrap: a new database, and the loss of everything encrypted in the old one.
11. Routine Maintenance
11.1 Credential and Key Rotation
Language-model API key. Set it in Settings, or:
crogl set-secret --key lm_api_key --value '<new-api-key>'
No restart required — the server invalidates its secrets cache on commit.
TLS certificate (self-signed). Renew with set-access, which regenerates the certificate with the right names, refreshes the host trust store, and restarts Crogl:
$CROGL_HOME/bin/crogl.sh set-access <current-mode> --force
To install a certificate from your own PKI instead, set cert_file and key_file in $CROGL_HOME/etc/crogld.yaml and restart.
Administrator password. The local admin password is fixed for the lifetime of the install and cannot be changed from the UI. Your options:
- Recommended: move sign-in to your OIDC identity provider, which retires local-admin sign-in in favour of your own account lifecycle and role mapping.
- Reinstall the appliance with a new password staged at /etc/crogl/admin-password.
Startup key. Not rotatable in place. Moving to external PostgreSQL issues a new one — replace your stored copy when you do.
11.2 Software Updates and Upgrades
Upgrade Crogl in place with the new release's installer. Your data, accounts and bootstrap secrets carry over. This follows the Upgrade procedure in the Crogl documentation (Operations → Upgrade, also served on every instance at https://<your-host>:4043/docs/). The installer is self-contained, so the upgrade needs no internet access and the crogl-airgap egress switch can stay on throughout. On this AMI, CROGL_HOME is /home/ubuntu/crogl.
Get the installer. Use crogl-<version>-linux-amd64.sh from your Crogl representative, brought in through your organisation's approved transfer process. Each version's AMI also carries its own installer at /opt/crogl/crogl-installer-linux-amd64.sh, so you can copy it from an instance launched from the new version's AMI. Verify it before use:
sha256sum crogl-<version>-linux-amd64.sh # compare with the published checksum
Plan a maintenance window. Crogl migrates its database when the new version first starts, and a release may change the schema in a way the earlier version cannot read. Move every Crogl component to the new version together: the server, and the crogl CLI on each machine that connects to it.
Back up before you stop Crogl, and keep the backup until you have verified the upgrade. Dump the bundled database from its container and archive the persistent files beside it: the bootstrap secrets, the startup key, and the attachment files whose records live in the database. Store the archive off the instance with your saved copy of the startup key, and protect it as you protect that key.
umask 077
BACKUP_DIR=$(mktemp -d "$HOME/crogl-backup.XXXXXX")
STAMP=$(date -u +%Y%m%dT%H%M%SZ)
docker exec crogl-postgres pg_dump -w -U crogl -d crogl -Fc > "$BACKUP_DIR/crogl-db-$STAMP.dump"
tar -czf "$BACKUP_DIR/crogl-var-$STAMP.tar.gz" -C "$CROGL_HOME" \
  var/bootstrap-secrets.enc var/bootstrap_encryption_key var/attachments
The dump and the archive run one after the other while Crogl still accepts writes. An attachment deleted between them leaves a database row without its file, and Crogl then marks that file unavailable. For a consistent copy, also take an EBS snapshot (section 10.2) after crogl.sh down in the next step. Nothing writes while Crogl is stopped.
Upgrade. Run the installer over the existing install. It asks "Replace application files and preserve existing local data? [Y/n]". Answer Y, the default. To run it without prompts, pass --preserve --yes. Never pass --clean, which discards your data. The installer keeps etc/crogld.yaml and migrates it if the new version needs that. Save a copy first anyway, so you can compare.
INSTALLER=./crogl-<version>-linux-amd64.sh
$CROGL_HOME/bin/crogl.sh down
# take the EBS snapshot (section 10.2) now, while nothing writes
cp "$CROGL_HOME/etc/crogld.yaml" ~/crogld.yaml.bak
bash "$INSTALLER" --preserve --yes   # keeps your data and etc/crogld.yaml
# compare with ~/crogld.yaml.bak, then:
$CROGL_HOME/bin/crogl.sh up
Do not pass --force to up during an upgrade; it wipes encrypted state.
If the start fails during migration, Crogl stops before changing the database and the message is in $CROGL_HOME/var/log/crogld.out. Collect it and contact Crogl support (section 13).
Roll back. To return to the earlier version after a completed migration, restore the database dump and the archived var/ files from the same backup, then re-run the earlier installer and start Crogl. Reinstalling the earlier version alone does not undo a migration. If an earlier version is started on an upgraded database without that restore, it shows none of your data or fails to start, and the next start of the new version stops with an error in crogld.out that includes "migration history exists in both public and private schemas (restore the pre-upgrade backup)". Restore the pre-upgrade backup, then start the version it came from.
Collation warnings. If Crogl or PostgreSQL reports a collation version mismatch after an upgrade (for example "The database was created using collation version 2.43, but the operating system provides version 2.44"), contact Crogl support for the bundled-database migration script and guide, and schedule a separate maintenance window for it. The installer does not run it automatically.
Alternative: a new instance. To move to a clean host instead, back up as above, launch the new version's AMI and let the first-boot install complete, then restore the database and var/ files following section 10.3, re-apply your crogld.yaml blocks and set the access mode. Terminate the old instance once the new one is verified.
Operating system updates. Apply OS security updates on your own cadence. If the crogl-airgap switch is on, it blocks the package archive and stops the automatic update services. Turn the switch off for the update, then turn it on again. Where the instance has no route to the archive, use a package mirror inside your boundary instead, and add the mirror to /etc/crogl/airgap.allow if its address is outside the private ranges. Update commands:
sudo apt-get update && sudo apt-get upgrade
11.3 License Management
Crogl licensing is managed through AWS Marketplace. Your subscription is tied to your AWS account and billed through your AWS bill. No license keys or activation codes are required.
To manage your subscription, go to AWS Marketplace Subscriptions in the console, find "Crogl" in your active subscriptions, and manage or cancel as needed.
11.4 Log Rotation
crogld rotates crogld.log itself at 100 MB and keeps its 10 most recent compressed archives. It also rotates on SIGHUP, which is how you add time-based retention:
# /etc/logrotate.d/crogl
/home/ubuntu/crogl/var/log/crogld.log {
    daily
    rotate 14
    compress
    delaycompress
    missingok
    notifempty
    nocreate
    postrotate
        pkill -HUP -x crogld || true
    endscript
}
Two settings are load-bearing. postrotate is what makes crogld release the renamed file — without the SIGHUP it keeps writing to the segment logrotate moved aside, and the fresh file stays empty. nocreate leaves the new file to crogld, which creates it owner-only.
crogld.out is neither rotated nor pruned — it is the launch script's redirect, so a crash-looping server grows it without bound. Rotate it here too, or leave headroom.
11.5 AWS Service Limits
| Service | Default Limit | Crogl Requirement |
|---|---|---|
| EC2 running instances | Varies by region | 1 per Crogl deployment |
| EBS volume storage | 50 TB | 100 GB–1 TB per deployment |
| Elastic IPs | 5 per region | 0–1 per deployment |
| Security groups per VPC | 2,500 | 1 per deployment |
To request increases, visit AWS Service Quotas in the console.
12. Emergency Maintenance
12.1 Troubleshooting Quick Reference
| Issue | First Check | Quick Fix |
|---|---|---|
| Service won't start | tail "$CROGL_HOME/var/log/crogld.out" | Fix config, then crogl.sh restart |
| UI unreachable from the network | grep bind_host $CROGL_HOME/etc/crogld.yaml | crogl.sh set-access direct --hostname <name> |
| Instance unreachable | SSH timeout | Reboot via the AWS Console. If that fails, stop and start the instance |
| 401 on the API | Token expiry | crogl login |
| Database error | Bundled PostgreSQL container | docker exec crogl-postgres pg_isready -U crogl; verify host port 5433 |
| Agent not responding | docker logs crogl-agent-u<uid>-c<id> | crogl.sh restart |
| Browser rejects the certificate | openssl x509 ... -noout -enddate | crogl.sh set-access <mode> --force |
| EBS volume full | "No space left on device" | Expand the volume in the Console, then sudo growpart /dev/nvme0n1 1 && sudo resize2fs /dev/nvme0n1p1 |
12.2 Complete System Restart
$CROGL_HOME/bin/crogl.sh down
$CROGL_HOME/bin/crogl.sh up
Or in one step:
$CROGL_HOME/bin/crogl.sh restart
Do not use up --force as a troubleshooting step. It regenerates the bootstrap secrets and makes all encrypted data unreadable.
If containers are wedged and a normal restart does not clear them:
$CROGL_HOME/bin/crogl.sh down
docker ps -aq --filter name=crogl | xargs -r docker rm -f
$CROGL_HOME/bin/crogl.sh up
12.3 Software Recovery
If the instance is in an unrecoverable state:
- Take an EBS snapshot of the current instance to preserve data.
- Launch a new instance from the latest Crogl AMI and let first boot finish.
- Restore state — see section 10.3. You need the startup key.
- Re-apply configuration — your crogld.yaml blocks, then set the access mode and platform.origin.
12.4 Roll Back OS Hardening
If CIS hardening conflicts with your environment:
sudo /usr/local/sbin/cis-unharden.sh --yes
sudo reboot
Before you do: unhardening removes the host firewall rules that keep Crogl's internal services off your network. Afterwards, allow only ports 22 and 4043 in your security group, or confirm that nothing outside the host can reach any other port. Alternatively, relaunch from the previous AMI in the lineage — every build is tagged in EC2 with Project=Crogl, Version, and BuildDate. The air-gap switch is not affected. crogl-airgap holds its rules in a table of its own and loads them from its own service, so unhardening leaves them in place and crogl-airgap status still reports the true state. See section 7.5.
13. Support
13.1 How to Get Support
| Channel | Details |
|---|---|
| support@crogl.com | |
| Community | crogl.com/community |
| Documentation | On your Crogl instance at https://<your-host>:4043/docs/ |
| AWS Marketplace | Use "Contact seller" on the Crogl Marketplace listing |
13.2 Information to Include
For the fastest diagnosis, include:
- AMI ID and Crogl version ($CROGL_HOME/bin/crogl version)
- Instance type and region
- Whether the first-boot install completed (/var/lib/crogl/installed)
- Relevant excerpts from crogld.out, crogld.log, or /var/log/crogl-firstboot.log
Redact credentials before sending. Logs can contain connector names and request paths.
For questions or feedback, contact support@crogl.com.